DIY December Bucket List

December. The holidays. The events. The parties. The traditions. There is so much to be mindful of this month because before you know it, the month is over and we are left wanting to do some things we inevitably missed during this magical season! I have just the thing to get you in the spirit, spend some quality time as a family and help you plan what matters most to you this month! For under $15, you can create your own December Bucket List, DIY style! This will help you prioritize the special events & traditions you don’t want to miss as well as make a nice decoration you can use year after year!

The supply list is simple to find items and can be customized depending on budget and desires:

Photo Frame
White computer paper
Sharpies (or markers in any color you want)
Paint/brushes (any color you want)
Sticker or embellishments (holiday/winter themed)
Glitter glue or loose glitter
Ribbon
Hot glue gun or tape

You probably read the list of supplies and thought to yourself that you have most of them already at home! Chances are if you have kids or are a habitual crafter like me, you have at least 50% of them stashed somewhere! The next step is really up to you. Paint the frame any which color you want and in any style you wish. Add as much or little embellishments and stickers to the frame as you crave. Skip the glitter or go crazy!  This is you time to be as creative as you want!  My son really was very symmetrical with his design, but there is no right or wrong way to use your imagination. A December Bucket List your way is the best way!

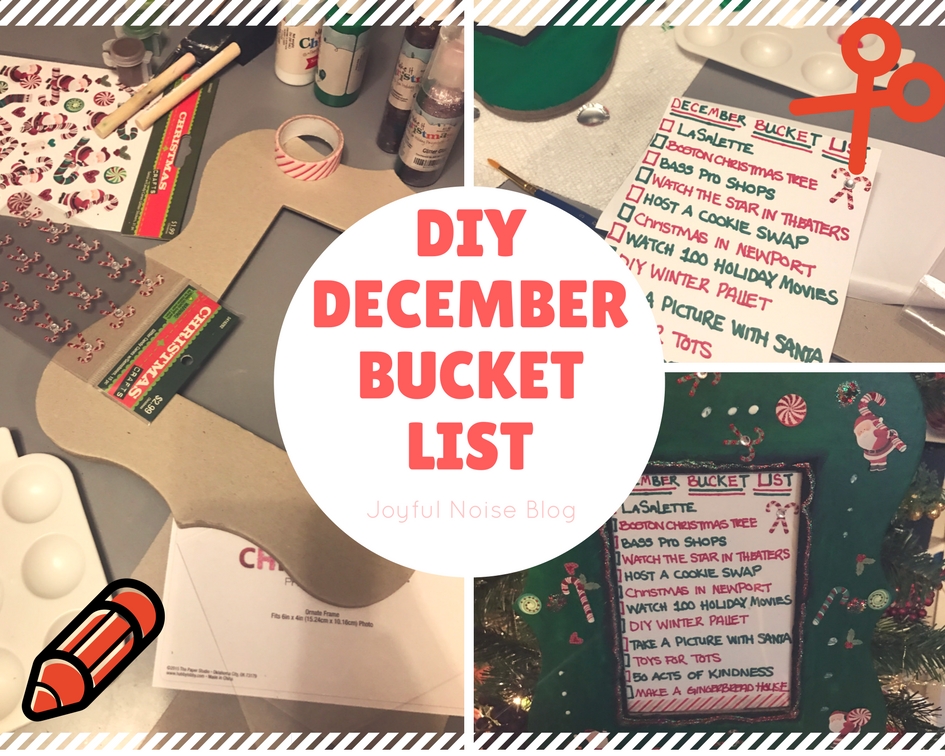
The last step was in my opinion the most fun! We thought of 12 things (sticking with the 12 days of Christmas theme we all know & love) to add to our DECEMBER BUCKET LIST. We cut a piece of computer paper to fit inside the frame before we started. We started reminiscing about all the things we like to do, things we wished we did, things we never wanted to do etc.. We started jotting them down on the scrap paper we just cut from. This helped us narrow it down to the items we knew needed to included and those that did not.

We were so excited to start our list that after we made it, we went out and completed 2 and started a few more! The holiday movie one is an activity that we have been working on since Thanksgiving so thankfully we have a nice head start! Each year I will scrapbook the list with some photographs of the activities listed. Then we will rewrite one every year on Thanksgiving when we decorate the tree. A new tradition is born!  What are some of your not-to-miss bucket list items for the month of December? Let me know what activities you are going to put on your December Bucket List by commenting below!

Merry Holidays~
Joy

Simple DIY Fall Pallet Decoration

DIY FALL PALLET- SIMPLE AND SO CHIC…

I love fall. It truly is my favorite season. It is the gateway to cooler weather, leggings & tunics, football, pumpkin spice everything and so much more. My fall decorations from previous years were starting to look a little drab, so I had to toss them last year. I was sad to see them go. However, without doing so I might not have had the great idea to make my own decoration this year. This  DIY Fall Pallet Decoration is so simple and you can reuse it for years to come. You only need about $30, 2 hours (total time including drying time) and a little creativity!

What you need:
Pallet
Outdoor Spray Paint/Paint
Paint Brush
Creativity
Ribbon *optional
Stencils *optional

I found my pallet on the side of the road for FREE! But, you can find them at your local hardware store for under $20 or ask local garden shops if they can spare one! You’d be surprised how many extras they have to give! I already scored another one for my DIY Winter Pallet! I bought outdoor spray paint, paint brushes and a sample of outdoor paint at my local hardware store. That’s all you need!

fall-pallet

I had letter stencils and ribbon already in my craft stash. I freehanded the pumpkin from an image online. My pallet cost me about $15, but shouldn’t cost more than $30 if you have to buy everything. What a great deal! If I didn’t have to spray paint my pallet, it would have been even cheaper. I needed to spray paint my pallet because it was written on already. I find the natural color and texture of the aged pallet would make for a fine background for your creation!

I found that keeping the theme to just “Fall” versus anything else will allow me to keep it up through the Thanksgiving holiday. I saw a ton of these floating around Pinterest, saying “Grateful” or “Give Thanks” and “Trick or Treat”, but I find those limit the time that they can be left up. I put mine up half way through September and will take it down December 1st. I like a long shelf live with my projects! My winter one will go up on December 1st and hope to keep that one up through February! You’ll have to come back and see what I have in store for that one as well!

Until then, get crafting! I would love to see your projects!

Namaste~
Joy

Baked Apple Chips & 21 day fix approved

Apple’s are delectable. I will take them anyway I can get them. Sauce, Pie, Cobbler, Crisp, Chips or right off the core! I have made & consumed them in all these ways except Apple Chips. I occasionally buy a bag of dried apple chips, but they always end up disappointing. They are either too sweet, not sweet enough or just a pile of crumbs at the bottom of the bag. And to top it off, they are not cheap. Usually no less than $3 for a small bag. A few weekends ago, thanks to Storm Neptune, I had some time on my hands. I made Apple Chips for the 1st time. And let me tell you, it certainly won’t be the last.

photo 1 (29)

It’s quite simple really.  Apples, Cinnamon and  Sweetener are the only ingredients you need. Add a baking sheet, some parchment paper, a sharp knife (or mandolin cutter) and you are in business. Preheat your oven to about 200 degrees. The low temp allows you to keep them in the oven longer. They will crisp up nice and slow and ensure that you won’t burn them. Slice your apples as thin as you can. The thinner the apple slice, the faster they will crisp up in your oven.  Lay the apples on a parchment paper (or slip mat) lined cookie sheet. Mix together about 1 tbsp of cinnamon and 1 tbsp of sweetener of your choice. I used stevia. This will cover about 2 apples. Adjust depending on how many apples you use. Sprinkle the mixture on the apples. You can do both sides if you want, but I prefer only doing one side. Place in oven and set timer for 1 hour. Flip after one hour and put back into oven for another hour. After 2 hours are up, I shut the oven off and let them sit in the oven for another 30 minutes or so. I did a workout, took a shower, washed the dishes and checked my email all while these bad boys cooked (crisped) away!

photo 2 (28)

I love this recipe and will be making it again and again. I can ensure there are no added and unwanted ingredients, especially added sugar. For those who follow the 21day fix plan (which I LOVE), as long as you stick with the recipe above, you can enjoy these for a mere PURPLE container! This 21 day fix recipe for baked apple chips is so easy to make, it will become a staple snack in your house! time I think I will add only cinnamon, as I love the flavor. If you love apples as much as I do, this is a must try. Let me know if you try these!

photo 4 (22)

Happy Snacking ~ Namaste

DIY Valentine’s Day gift for Mister

Valentine’s Day is upon us. Most believe it is a made up holiday that’s sole purpose is to make us dive deeper into our wallets and spend more money. And right after the holidays? Who has tons of extra money laying around? I don’t. But that doesn’t mean I still don’t like to give my special someone a token of my affection. This DIY Valentine’s Day gift for Mister (or Mrs.), is perfect. It cost under $10 to make and you really do NOT need to be an expert artist.

Tools needed:

White Ceramic Mugs- found at The Dollar Tree: 2 of them

Pencil with eraser

Permanent Markers in 3 different colors- Paint markers or Sharpies work best

THAT’S ALL YOU NEED!  LET’S GET CRAFTY!

valentines2

Directly across from the handle on the mug (other side of mug), start drawing a large heart. It took me a few tries until I had both “humps” on the heart looking right! Do this step for both mugs. Place the heart drawings onto each other, so that the handles are on the outside. The two hearts should make one larger one. If not, erase a few spots and work on making them look cohesive. Once they do, color the hearts in two different colors. Add your names, Mr/Mrs, Boyfriend/Girlfriend, Mrs/Mrs…. You get the idea. Let dry for 24 hours, wrap and  then enjoy a cup of cocoa, tea or coffee with the one who makes your heart complete.

valentines1

Can’t wait to give mine to my Mister! I would love to yours if you make one! Email, Facebook, Tweet or Pin me!

~Namaste~

The 31 day Purge

I still do not know what I got myself into. A friend posted on Facebook about this 31 day purge she was doing. It is being run by the lovely blog  A bowl full of lemons. Without even knowing what it entailed, I acknowledged my acceptance of the challenge on Facebook for all to see. Boy, am I happy I did. Yesterday, being only day 1, I already feel better after completing my 1st task. I can only imagine how I am going to feel after day 31!

Day 1 was to clean your cupboards. Get rid of unwanted food- donate it, trash expired food maybe even get rid of those cookies you know you shouldn’t eat! I was surprised at how much food went expired. And not by a mere month- I am talking about year 2013. Not proud- but happy it’s gone……Living in a 690 sq. ft home, I have one cupboard. For everything- spices, dry goods, canned goods, you name it- it needs to fit there. You can imagine the mess it can become.  Here are some before and after shots of my handy-work.photo 1 (9) photo 2 (8)Will you join me on the 31 day purge? Follow along here and don’t forget to post your purge pictures and tag them using #abfol31daypurge. Thanks A bowl full of lemons for the jumpstart I needed to get my house in order! Here’s to a productive month and hopefully less cluttered house in the end!
Namaste~  Joy

Sensory Activity: Calm Down Jar & I Spy Bottle

Howdy folks! It’s Monday again. Which means, I have another “Make-it-Monday” activity to share with you. With Landon being a sensational kid and all, what better thing than to make something to help him when he needs it most! Kids with Sensory Processing Disorder are known to have a emotional extremes. Having something tangible for Landon to hold/look at/admire when he is trying to regulate his emotions is a great tool we found that works. I hope you find it helpful, for any kiddo as well! And to boot, it was fun to make!

photo (17)

Filling the bottle


Supplies Needed:

PLASTIC BOTTLE

PLASTIC BOTTLE

SMALL TRINKETS

SMALL TRINKETS

ELMER'S CLEAR GLUE & GLITTER

ELMER’S CLEAR GLUE & GLITTER

Directions:  Pretty darn simple. Fill the bottle 2/3 of the way with a lukewarm water. Then add the whole bottle of glue, followed by the glitter. If the glitter falls right to the bottom of the bottle, you may want to add more glue. Especially if you use a bottle bigger than a 20 oz. one. Once you have the glue/glitter/water combination down, add the small objects. We chose a Lego head, pony beads, letter beads (his initials)  2 small Lego pieces, lanyard pieces and a penny.  There you go- You have yourself your own I Spy/Calm Down Bottle!

~Namaste~


photo (20)

Finished product!

Creativity amid Chaos

I don’t have a regularly scheduled “Girls Night Out”, (which I am thinking now I should). I don’t work outside the home. I rarely have adult contact throughout the day, (the husband doesn’t count). Most of my free time is spent at the studio working out, running outside, showering (a long, hot one) or playing Legos. So, this weekend when my scrapbooking retreat came I was so very excited. I have been on two already this year, but this one was different. I was going out-of-town for it.  I was attending a Cool Crops Scrapbooking retreat. Staying at a hotel, meals being prepared for me, and coming back to a bed that had been turned down and ready to go.  Oh Yes. I was thrilled. Not only would I have almost 3 free days of no cleaning, cooking, letting the dogs out, feeding said dogs (and cats too), but I would be able to embrace my creativity. But, in all things “Joy”, nothing goes as planned.

Creativity amid Chaos seems like it shouldn’t work. And when things started to go awry on my retreat, I thought it was hopeless. Boy was I wrong. For starters, no sooner did I arrive in Maine, the husband called to let me know that Landon needed to be picked up from school. He was complaining of a headache. Normally, this wouldn’t have been such a big deal. However he has been complaining of headaches for over a month now. We even had a headache chart the doctor wanted us to fill & monitor. So, of course I am a wreck. Then my neck & shoulder started to throb. Numbing pains shooting down swiftly. It would make me lose all my feeling in my hand (writing hand no less) and mess up each time it did. Then my tooth started to throb. Friday night I felt like someone had stepped on my jaw and broke it into a billion little pieces. I contemplated leaving Saturday morning. How could I concentrate and create masterpieces when my mind was obviously all over the place.

A call to my dentist for a prescription, a trip to a local CVS and lots & lots of caffeine, I made it  through the weekend. And, honestly think that because I had to concentrate hard on not focusing on the pain & what was going on at home, I completed my most pages ever- and some of my favorite ones as well. The moral of the story is: when chaos takes over your life, embrace it. You never know how it can affect you in a positive way. Sometimes it’s best to just “roll with the punches”……. Or my favorite saying, “When life gives you lemons, you make Margaritas”!

~Namaste~

-HERE ARE SOME OF MY FAVORITE PAGES FROM THIS WEEKEND-

Please excuse the terrible quality of the photos- as my son cracked my screen on my Ipad…..Boo 🙁

photo (2)

photo (1)

photo (3)

photo (4)

Make it Monday- DIY Collage Frame

My house is small. Like 640 sq. foot small. I love it (most days). It’s easier to clean, cheaper to heat but has it’s drawbacks as well. I love pictures. Anything really. Prints. Vintage. Photographs. Even Landon’s artwork deserves to be showcased on a wall. However, with an entire wall being utilized by our TV/Bookshelf wall unit in our tiny kitchen/living room combo- it truly leaves no where for us to hang pictures.

I saw this project on Pinterest. Oh, how I love thee. You can make me so motivated and yet so unhappy the next. I mean, sure I am crafty. I can handle myself with most projects I see & love. But, then I see you need space for “said” project. And it reminds me that my house is the size of someone’s two-car garage. When you are like me and love to showcase many photos at once, this project is a must. And if you are also like me, with always needing to change out “said” photos every once in a while, this project is a must. Just take my word for it. This DIY Collage Frame project is must and can work in any room.

Materials Needed:

A frame  ( I suggest one large enough to hold 4- 4×6 photos to get the most out of it)

Twine/Ribbon/Yarn (in a coordinating color with the room you choose to display in)

Scissors (to cut with-LOL)

Mini Clothespins (any craft store will have these)

Tape ( to tape ribbon/twine to back of frame)

You can see my finished project below. I love it so much. I will be making one for my son’s room as well as a gift for my mom. You can get as creative as you want with this. This is such a great space-saving project, but also so unique to add to any room regardless of size/space limitations. If you try this- please let me know! I love seeing finished projects!

Photo on 3-24-14 at 8.57 AM


Photo on 3-24-14 at 8.59 AM

Art Therapy – Wordless Wednesday

Art Therapy: Art is an amazing thing. I could talk all day about the benefits of doodling, painting, crafting, sculpting and all facets of art. But- I will just show you how art transcends age limits, disabilities, handicaps: for it is a universal language. One you can interpret how you see fit. Landon had his Intro to Watercolor class today at the Warwick Museum of Art. He went this summer as well- the only 5-year-old in the program designed for 6+ and up. His artwork caught the attention of the instructor and she knew he would excel and take it seriously. He was back for more during February vacation! Here are his pieces that he named himself:

Dragonfly- Elanna's memory

Dragonfly- Elanna’s memory

Flower Brought to Life

Flower Brought to Life

Sunset over Waves & Rock

Sunset over Waves & Rock

I love Colors

I love Colors